KJ Dollshouses Street Scene

Friday, 7 February 2014

"The Olde Curiosity Shoppe"

"The Olde Curiosity Shoppe"


The "Olde Curiosity Shoppe" may be small in stature but its absolutely packed with details and features including for the very first time a house with hidden built in micro speakers that can be connected to an MP3 player.

The house sits on a base approx 20" x 20" and is about 36" high.


It is the first house I have built that is only 3 storeys high instead of the usual 4 but this in no way means that it is not big on character.

Some of the features it includes are:

Remote controlled electrics
2 Working fires
Smoking chimney
Projecting 4 panel feature window to first floor
Brick plinth with Tudor herringbone brickwork
Pot hanging rail over ground floor fire complete with 6 hooks
Mouseholes complete with 2 mice
3 Bulb chandelier
Dormer window
Removable internal staircases
Hand sculpted roofing and paving.
Bay fronted shop window with real scalloped lead flashing
Double arched feature gable window
2 Hanging signs
2 Hanging baskets
All light fitting bulbs are replaceable
3 Built in micro speakers complete with an MP3 player

So you can see that even though its a smaller house than I usually build it has more features built into it than some of the larger ones.


Ground and First Floor Rooms


Bay Fronted Shop Window with Real Scalloped Lead Flashing


Front Elevation of House

The main feature to this house is the sound system that I have built into it. There are 3 hidden micro speakers which can be connected to an MP3 player or similar device via the 3 audio sockets built into the brickwork plinth. They are on separate circuits so you can play music or sound effects either through 1,2, or all 3 of them or by adding more than one device you can play different sound tracks in different rooms. You may have the ground floor set up as a pub and play crowd noises in there, the 1st floor could be a music room with medieval minstrel music playing. I have even included an MP3 player and all of the necessary leads so that you are ready to go.


All of this is available for what I think is a very reasonable price of:

£1500.00


Thursday, 12 December 2013

SMOKING CHIMNEY

SMOKING CHIMNEY

 
I HAVE NOW COMPLETED A COUPLE OF HOUSES WITH THE REMOTE CONTROLLED SMOKING CHIMNEY UNITS BUILT INTO THEM AND WHILST IT IS A BIT OF A NIGHTMARE TRAILING THE WIRES ALL THE WAY THROUGH THE CAVITY WALLS OF THE HOUSE FROM THE START TO THE FINISH I DEFINITELY THINK IT IS WORTH THE EFFORT.
 
 
THIS IS A PHOTO OF THE SMOKING CHIMNEY WORKING ON THE LATEST HOUSE I HAVE JUST FINISHED FOR A CUSTOMER AND AS SOON AS I CAN WORK OUT HOW TO UPLOAD A VIDEO USING WINDOWS 8 I WILL DO.
 
THIS HOUSE IS CALLED A "SPECIAL DELUXE ROCHESTER" AS IT WAS SPECIALLY COMMISSIONED TO HAVE A MARKET AREA BENEATH IT AND AN ADDITIONAL DETACHABLE MARKET AREA TO THE SIDE OF IT. I WILL BE PUBLISHING THE FULL DETAILS OF THE HOUSE ON THE BLOG SOMETIME NEXT WEEK. IN THE MEANTIME HERE IS A PHOTO OF THE FRONT OF THE HOUSE.


Wednesday, 13 November 2013

KEEP AN EYE OUT

I haven't updated my blog for a while but intend to start doing so shortly.

I've recently developed some new ideas and features, the most exciting being the remote controlled smoking chimney, and will be posting further details shortly.

Once I have completed the commission I am working on now I will be starting the build of what I intend to be the most exciting house so far complete with sound effects and built in camera, so please bear with me and keep an eye out for more news.

Many Thanks,

Kevin

Tuesday, 12 February 2013

NEW HOUSE DESIGN FOR SALE "MINSTREL GALLERY"

 
I am really pleased to be able to post details of my latest house design, "The Minstrel Gallery" which I am very proud of.
 
 
I have always said that I prefer to build houses on commission basis so that my customers get the house of their dreams and can also feel as though they have been instrumental in it's creation and design by way of the choices I offer them throughout the build process. This is not always possible as unfortunately I do not always have a queue of customers wishing to order a house from me. Its for this reason that I am now trying to build in as many adaptable features in my houses whereby the person who buys a house has options with regards to layout and panel choices as possible, hence the "Minstrel Gallery" came about.
 
Ever since developing the "Great Hall" feature in a house called the "Tudor Rose"  for my customer, Maria Saltrese, I have found the double height fully timbered hall feature to be one of the most popular options chosen by future customers for my houses, however due to the fact that the hall is created at the loss of a room it is a feature I usually only build into my larger houses, that is until I came up with the "Minstrel Gallery".
 
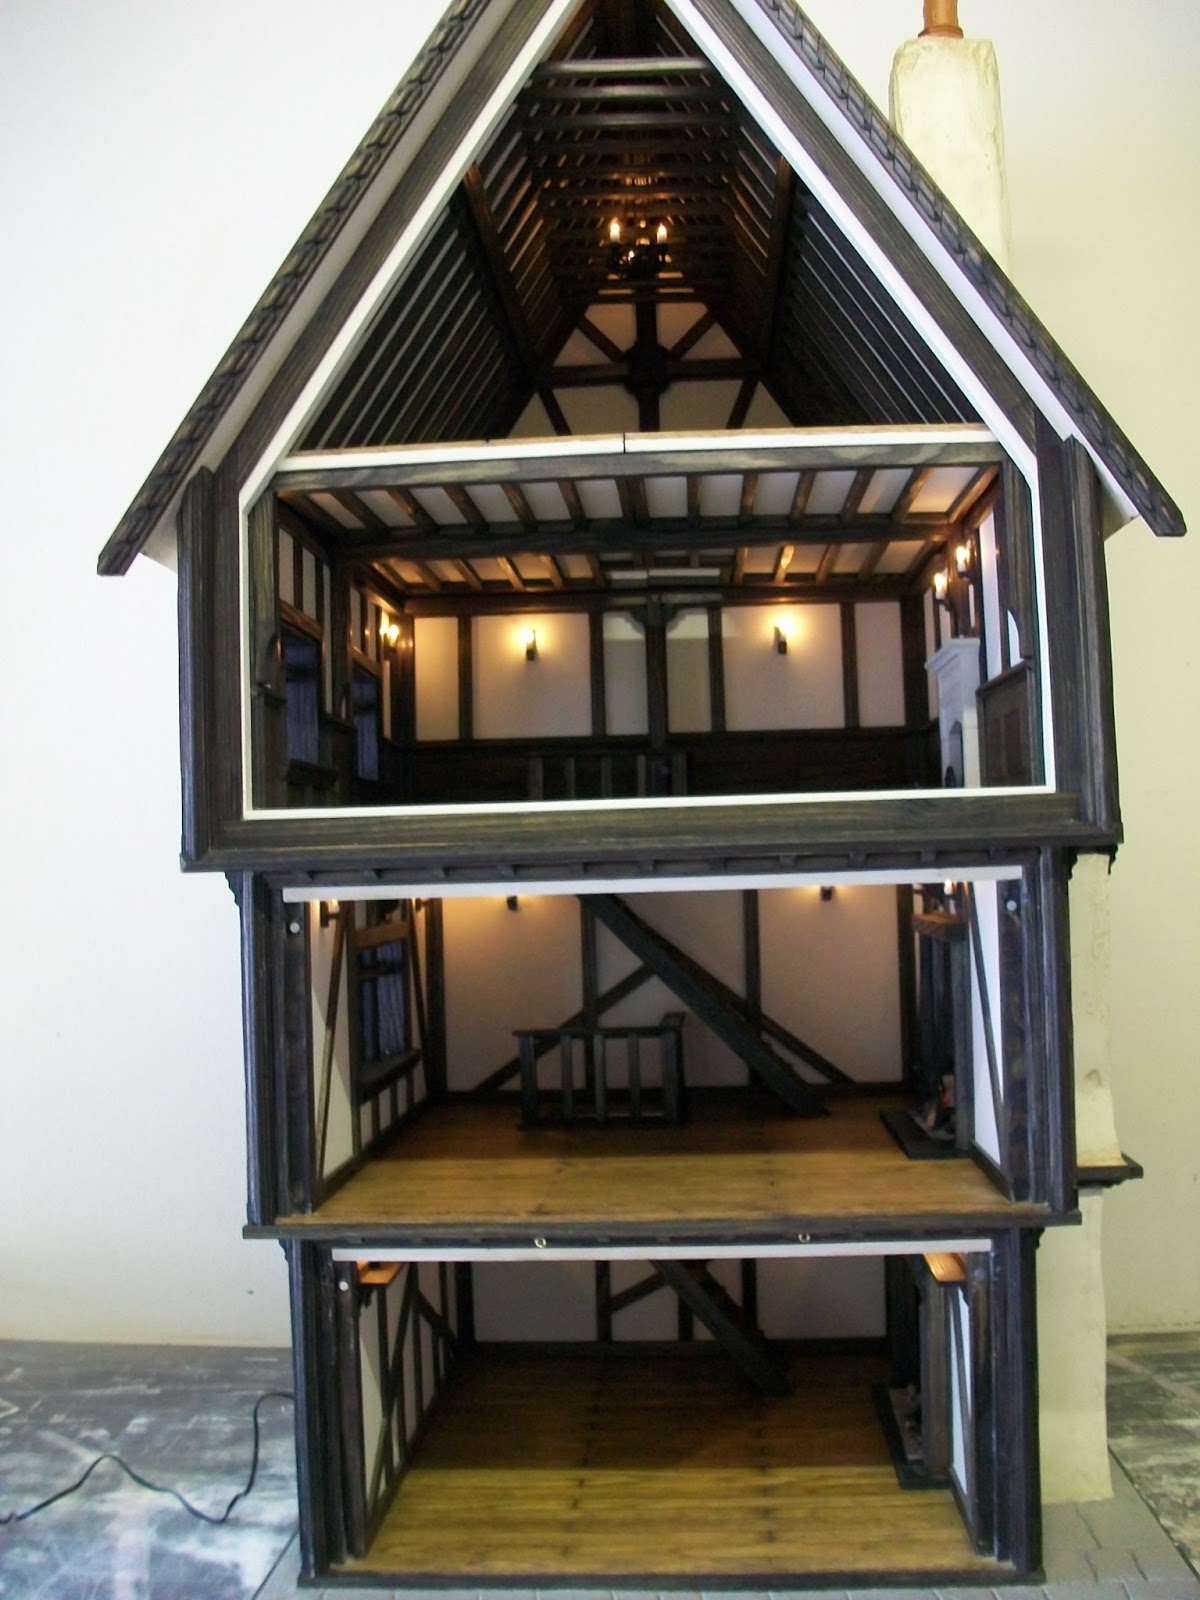
The "Minstrel Gallery" is based on one of my medium sized houses which originally consisted of a 4 storey house with a room on each floor. With the "Minstrel Gallery" I have built a single room on the ground and first floor but have then created the Great Hall feature above extending 2 storeys into the roof space.


"GREAT HALL" FLOOR LAYOUT.
 
In the "Great Hall" option you have a fantastic large space in which to set up a banqueting hall complete with real stone fireplace, Oak wall panelling, working wall lights to 3 walls and 2 leaded light windows which are set into walls that are 4 times thicker than my usual wall construction thereby forming useful extra wide window sills in which accessories can be displayed. There is also a 3 arm chandelier hanging high in the roof timbers as well as 2 more high level lights set into the central roof beam that runs from the front to the back of the house. The 3 different lighting options, wall lights, chandelier and high level roof beam lights are all on different electrical circuits so they can be used individually or in any combination you might want, all being controlled by way of a remote control system. The electric fire can also be controlled independently by way of the remote control.
 
The second option for the room layout is to remove the timber rose detail which sits centrally on the timber beam across the back of the hall wall, which is held in place with magnets, then slide in a narrow piece of fully boarded and beamed floor panel which sits across the rear of the house sitting on wooden beams which are fixed in to place thereby forming a balcony. There is then a loose section of balustrading which stands on top of this section to the front of it, followed by a vertical ladder that stands in the stairwell opening at the rear of this piece.
 
With all of these pieces in place, which takes 2 minutes to do, you now have a "Great Hall" with a "Minstrel Gallery" overlooking it which is exactly where the minstrels and entertainers of the day would have been located.


"MINSTREL GALLERY" FLOOR LAYOUT.
 
The final option which takes about 5 minutes to do is to remove all of the "Minstrel Gallery" items and replace these with 2 timber beams that sit on ready made brackets across the width of the room at the centre and the front, with these 2 beams in place you can then install 2 pieces of fully boarded and beamed floor panels which completely divides the "Great Hall" space into 2 separate room spaces. To complete the transformation and to make it look like a permanent fixture you install another complete set of stairs followed by a balustrade handrail that sits around the stairwell opening on the upper floor.


"ROOF ROOM" FLOOR LAYOUT.
 
 
The main reason for keeping all of the lights on different electrical circuits was so when you opt for the complete room division layout you can still control the lights for each room independently.
 
 
The reason that I have increased the external wall thickness which has resulted in the very useful extra wide window sills is because the whole structure of this house is formed using a cavity wall system which started to make it easier for me to hide the lighting wiring. In my earlier houses most of them only have wall lights on the back walls and the external wall that has the chimney on it. This was purely because I could hide the wiring in the chimney and bring them straight out of the rear of the house. I hadn't been happy with not having lights on all 3 walls so came up with this solution, which has made the house design much better for multiple reasons now.


HOUSE LIT WITH ROOF ROOM LAYOUT

 
HOUSE LIT WITH MINSTREL GALLERY LAYOUT

 
HOUSE LIT WITH GREAT HALL LAYOUT


The house has numerous other features which I install in my houses including removable internal stairs for those who want more floor space to accessorise. Three working fireplaces all being controlled individually by the remote control system and on the ground floor an extra large fireplace complete with a spit roasting pig, with a hanging rail above to hang pots and pans from. This room is also fitted with a plate rack to all 3 walls.


PIG SPIT ROASTING FIREPLACE 


FIRST FLOOR AND GREAT HALL STONE FIREPLACES


Friday, 14 December 2012

MAKING NEW RANGE OF PRODUCTS


I recently exhibited 2 of my houses at the Kensington Dollhouse Fair and although I received fantastic comments and compliments for the 2 new style houses I took, as is the norm for me for shows here in the UK I didn't sell any. When I got back home and realised that with all of the costs involved including van hire, diesel, hotel, parking and the show costs themselves, I had spent about £500.00 just to here a few compliments I decided I had to think about making smaller items that I could sell alongside my houses at future shows.

At first I thought I would try to stick with the Tudor theme but soon realised that it would severely restrict my options and my customers if this is what I did. I therefore went into my workshop with no idea what I was going to do, after a little messing about and experimenting I decided to make a range of garden furniture to sell as finished items with the future intention of dressing them with tablecloths and food etc to sell as completed dressed items. (These will be featured on later blogs)


The first item I came up with was a standard picnic table with a bench on either side. I soon discovered however that I couldn't bring myself to just throw these pieces together and I wanted to make them to the same standards as I do my Tudor dollhouses, hence this bench has proper half housed joints and timber pegs securing all of the pieces together, so not a 5 minute job then. 


I moved on to making square tables with 4 fixed bench seats, one which has a 6" square table and a smaller one with a 4" square table, but both with the same amount of detailed work to them including their framework and also the scalloped ends to the support rafters.


For a real head scratcher I moved on to a more complicated geometric shape and made an octagonal picnic table with a continuous perimeter seat all the way around the outside of it. This made the supporting framework even more difficult to get right, but it worked out really well.


Next I tackled a gazebo style bench seat complete with hand made trellising to both sides which I am pleased with but can only see a limited way in which customers could further dress it by adding climbing plants and trailing flowers etc, so I moved on to a bigger challange.


And here it is the most difficult piece I have made so far. A 4" (4 ft) square table complete with 4 fixed high back chairs with scalloped heads. I am really pleased with how this turned out and am currently thinking of what to make next so any suggestions would be gratefully received.